
Let’s finish our digital discussion with a review of how you can use a series of digital images together to form a photo backdrop for your layout. As I mentioned in Part 1 of this discussion, realistic backdrops for your layout can be made using one or a series of digital photographs. Of course good backdrops start with good photographs, so remember that you’ll have to do a little planning as to what you actually want to have in your backdrop and when’s the best time to take the photographs. For example, for my small Ontario town backdrop, I originally shot the photographs on a weekday during the summer on a sunny, well-lit day to minimize the shadows. What I forgot to consider was that there are a lot of people and cars constantly moving on the street and sidewalks. So as I carried my camera and tripod on the sidewalk opposite to the buildings I wanted to shoot, I found that I had cars partially in my shot and by the time I went to shoot the adjacent building, the car had moved and I was left with lots of editing to remove the cars and get the final image I wanted. A repeat trip on a Sunday afternoon produced much better results when the street was less busy, resulting in far less editing on the computer. The other thing to consider is that lighting may change while you’re photographing multiple images. Shooting on a sunny with partial clouds will change your lighting, potentially putting some buildings into shadows when others are properly lit. If the clouds are moving quickly, you may also find that your brilliant blue sky is actually changing color. Therefore, be prepared to adjust with changing conditions and just don’t rely on using the automatic exposure setting on your camera.
The key parts to photographing a large stationary scene include the maximum megapixel size that your camera can produce, a tripod, lens opening and lighting. As I discussed in a previous article, the larger the megapixel size will yield a picture that has finer resolution and ultimately produces a crisper image. While I’ve tried this technique with a camera with as little as 3.2 megapixels resolution, I currently use a 6.1 megapixel camera to do this work. If you have the ability to set your camera’s ISO setting, it should be set to the lowest value, since lower values produce the sharpest images while requiring the most available light. A tripod is essential for this operation, so that not only will you have a steady image, but you can adjust the relative height of your camera so that images are taken at a similar height, thereby reducing the vertical distortion you may get while photographing a building as you tilt the camera to get the top of the building into the shot. The lens size is important as you want to shoot your image with as little side distortion as possible. One of the lens I have in my photo bag is a 18mm to 70mm zoom, which is a very versatile lens. However, I cannot shoot at anything less than 50mm without starting to get the ‘fisheye’ effect. Therefore, you’ll want to select the correct focal length for your photo and stick with it for all of the photos you want to use for your background. Finally, as mentioned previously, good lighting is key to producing a photo with as few shadows as possible. Therefore, consider photographing your scene in the late morning to early afternoon to get the sun directly overhead, while remembering to keep it behind you. Avoid those hazy days, as the digital media picks up the haze very well.
I use digital photos in two different ways to create part of my background scenes. The first way is the simplest, and doesn’t really require any special software or editing. Once you have a photo or series of photos, the trick is to re-scale them using the computer, or alternatively take them to a color copy center (Kinko’s, Office Max, etc.) and have them enlarged to various sizes. Once I have the photos to the size I want, I simply cut them out and glue them to the backdrop using rubber cement or spray adhesive. I typically cut them out to remove any “sky” effects”, as I’ll either paint my backdrop in or spraypaint a few puffy clouds for background sky. I then use already made or purchased trees (Woodland Scenics or Scenic Express) placed in front of the backdrop to hide the paper edges or to transition the scene to a new scene. Small buildings also work well to hide breaks in your background scene. While you can tell that the background isn’t real, you’re typically watching the trains running around the layout and you don’t pickup on the details in your background as easily. One area where this background method works especially well is a small shelf, where the scenery gives a sense of depth to the layout. I use this technique to make backgrounds for my FreeMo modules, since being modules that travel and Free-Mo standards by their nature don’t use backgrounds. Therefore, to adapt the modules to my home layout, I’ve used several photos for the backgrounds in some area. I also limit the numbers of trees along the edge of the module, since they can easily become damaged during transit.
The other way that I use digital photos to create a background is to take a series of side by side photos to form a panoramic view. While in the past I have tried to match up parts of overlapping photos and tape them together, PS Elements offers a handy tool that PS Elements that “stitches” or merges the photos together automatically to create an overlapping panoramic view. While I don’t know what other graphics software call this feature or if they even support something similar, Elements refers to it as the photomerge commend. It’s a very simple process, as the photomerge command prompts you for the picture files you want to merge (it doesn’t matter in which order either) and then performs the transformation. If there was sufficient overlap of the images (Elements recommends between 15 and 40 % overlap), the source files will be blended together to form a new panoramic image.
Combined Photo
Click to enlarge
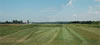
Combining a total of 5 photos together created the farm scene shown above. Each of the individual photos was taken using a tripod and keeping the focal length constant as I walked along a farm road. By setting up the camera every few hundred feet, I was able to capture the entire farm field, as well as the farm buildings in the background. However, I encountered a problem in about the left third of the photo, as you can see a visible crease or fold in the final image. This was created when I accidentally tilted the camera so that it wasn’t perpendicular to the field and didn’t realize it until after I had downloaded the photos. My other problem was that I missed one of my panels in this area of the panorama as the farmer was working his field and I couldn’t got his tractor working that part of the field as well as the adjacent area since I was slow in setting up the shots. However, as I’ve shown with the second article, performing some digital magic to blend in these areas, and cover some of the defects by adding more clouds to the sky easily changes this photo.
Combined Photo
Click to enlarge
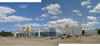
In the second photo example, I’ve shown you what happens when you can’t keep the same elevation for the photo. In this case, my second photo was taken at a slightly different height, which shifts the photos. This is easily fixed by using the cropping tool to remove the top and bottom of the photos. The foreground gravel in the second photo is slightly different in color, which I would require a small of blending to make this less noticeable. The clouds in the center of the photo would also need to be blended to improve the photo.

Combined Photo
Click to enlarge
The final photo shows a series of seven photos that I took from quite a distance, and on a road that was going uphill. The total view in the picture probably spans a quarter mile and shows the difficulty of trying to take overlapping photos when there’s very little difference in the background and no reference points to use. As much as I tried to pick the highest trees or distinct changes such as the water becoming vegetation, I missed part of the treeline between the third and fourth photos, as you can see that the height of the trees changed and jumps. To fix this, I would use the cloning tool to try to duplicate portions of the trees and paste them into the photo.
In summary, a series of photos is a good way to capture a panoramic view of an area, and then used to enhance the background of your layout. Remember that when photographing a series of images, I recommend using a tripod, keeping a constant focal length and not varying the lens. By either taping photos together or using software to merge them, you’ll get a pleasing background which is unique to your layout and saves you some $$$ as opposed to buying pre-printed backdrops.