
For the past several years, I’ve watched the slow decay of the print and slide format, and the continued emergence of digital photography. It has gotten more and more difficult and expensive to both get and process film, and recent announcements by photo giants such as Kodak suggest that support for film media will continue to decline. While I’ve tried several of the early point and shoot type cameras under a variety of conditions, I was never completely satisfied with the outcome. As the amount of megapixels increased per camera, in my opinion the ease of use for a railfan didn’t improve. My biggest complaints included trying to railfan when you could only shot one picture of a moving train while waiting for the camera to focus, the lack of a good depth of field, and generally poor focusing abilities of the units. I always felt you had just one chance to get your picture. However, with the continuous improvement to digital cameras and introduction of the digital SLR format, it’s gotten easier and cheaper to take multiple photos without sacrificing what the quality of the photo. No longer do you have to spend big $$$ on prints or slides and wait a week or longer to process your film to see how it turned out, only to be disappointed that the photo didn’t quite turn out or you missed the photo angle you were looking for. Digital photos allow you to instantly see what’s before you, with some of the newer camera’s allowing you to zoom to a very fine level of detail. So with all this said, should you consider going digital? The simple answer is yes. While I have shot predominantly in slide format for 30 years, I decided to make the investment with the recent introduction of many digital SLR’s. I selected a Nikon D70 camera, which can capture the fine close-up detail required for models, as well as the action shots I need for railfanning.
Before getting started on rail-specific aspects, let’s start a simple review of what can be done with your digital image. Prior to printing and/or publishing your photo to a website or the Trainwire, you can also use a photo-editing program to improve or alter the image, bringing out the finer details of your photo. For example, you can crop them, add or delete elements (such as those nasty pole lines which get in the way), and change colors or contrast. All of this is done using a computer and some sort of photo-editing software. Here are a few ways you can process or alter images to give you a better photo:
- Crop the photograph to emphasize the key part.
- Use filters to sharpen it.
- Stitch together multiple frames to create panoramas.
While digital photography begins with capturing images in a digital format (i.e. taking photographs with a film camera and scanning the slides, negatives, or prints or via a digital camera), I’m going to focus my discussion on ways to get better railroad related photos. While I choose the SLR route, the discussion applies equally to even the simplest point and shot type digital camera.
One of the best ways to improve the initial design of a model railroad is to photograph the real thing, deciding what you want to add or subtract from your modeled scene. Remember some model scenes work best due to the addition of multiple key features or details from numerous similar scenes that you’ve encountered. With a digital camera, you can take lots of photographs of the prototype, shooting from every angle, and reviewing your efforts immediately. Don’t like the exposure setting or determine that you cut out part of the building detail? Just review and re-shoot. Remember, digital photographs are cheap when compared to film processing after you’ve made the initial purchase.
Let’s start our digital discussion with roster shots, since many of us use these shots to get an idea of how we want to model various details for the engine, caboose, or rolling stock that we want to tackle next. Generally, roster shots work best from a 3/4-wedge view. I’ve found that roster shots work best when using a 50mm lens or something very close to it. Therefore, if you have a point and shoot type camera with a telephoto, experiment with the telephoto to get the best view. While there are many SLR lenses which can shoot at a lower focal length, the smaller the number, the greater the distortion or “fish-eye” effect. Now let’s consider where the sun is relative to your subject. While photographers know that the sun should be behind your back, I’ve found that the angle of the sun seems to greatly accentuate shadows for digital photos. A high noon sun usually takes away all the truck details that are best picked up until mid-afternoon. However, a high noon sun is great if you’re trying to pickup roof details from an overhead vantage such as a bridge. Generally, front-coupled locos are a no-no for roster shots, as you lose detail due to the adjacent unit casting shadows. While foreground clutter can be distracting, the advantage to digital photos is that many intruding features can simply be edited away with your software package. The same can be said for light or communication poles, although it’s best to start by framing your photos without them.
For action shots, one of the key things I’ve learned is that you have to un-learn what you previously learned for shooting slide or print film. Where I previously would take action photos at 1/250 th or 1/500 th, digital photos seem to require that the photo be taken at higher speeds. A simple rule is that a higher speed for digital format, results in a sharper image for the entire train. Many photographers prefer to use the Auto setting for their camera. For my Nikon, I’ve noticed that it will try to take at a setting of 1/800 th or higher for a sunny day. For example, a ¾-view action shot Trains taking at a slower speed may result in some blurring of the nose, while the main body of the engine is very sharp. Therefore, try shooting at 1/500 th and higher; reviewing your work trackside to determine what adjustments may be necessary.
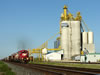
Click to enlarge
The photo to the left of the CP train passing the elevator shows the problems I encountered with a point and shoot camera. While I like the photo, it’s taken me many tries to be able to get this type of shot framed correctly, as the previous Sony point and shoot camera I was using couldn’t take more than one photo quickly.
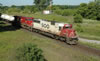
Click to enlarge
The photo on the left was taken with my SLR camera and illustrates the need to shoot a faster shutter speed. This photo was taken at a setting of 1/250 th of a second, and there is a slight blur on the nose of the unit, while the main body of the engine is in focus. In the next part of this article, I’ll show how the digital photographer can enhance photos by using software to remove unnecessary items such as pole lines or wires cutting across the photo.
The last thing I’d like to look at using the digital photo for is a backdrop scene. While there are many ways to make realistic backdrops, one of the easiest methods is to take a digital photograph or series of photographs. I recently took a trip to Ontario, where I took a series of photographs of several farms and treelines, as well as individual buildings in a small town, which will serve as the backdrops for several rural and small town areas on the layout. The way that I use the photos is to re-scale them using the computer (or alternatively you could take them to someplace like a Kinko’s and have them enlarged), to various sizes to simulate a farm, forest or tree line. I then cut them out and glue them to the backdrop using rubber cement or spray adhesive (available at craft stores). I use “regular” trees (Woodland Scenics or Scenic Express) in front of the backdrop to hide paper edges or to transition the scene to a new scene. While you can tell that the background isn’t real, when you’re running a train your eyes follow the train and you don’t pickup on the details in your background as easily. One area where this background method works especially well is a small (approximately six- to twelve-inch wide) shelf, where the scenery gives a sense of depth to the layout. I’ve also used this technique to make backgrounds for my FreeMo modules. I’ll show you how I stitched together several photos in an upcoming article to make a backdrop for my layout.