
Let’s continue our digital photography review with a discussion about editing your photos. How many times have you come across a great shot, only to see the finished slide or photo later on and realize that it was ruined by a power line or some other errant feature (ex. flanger poles) running through it? While sometimes you can simply crop an item out (if it falls along the side of your print), if you’re using film generally there's not a thing you can do about it. What about photographs that come back and your framing wasn't level? Again nothing can be done to save the photo. With a digital camera image and a good software package (such as Adobe Photoshop or Paintshop), a small amount of editing or touch up can save the shot. Most software packages will allow the user to alter one or more settings, remove unwanted items, and modify the final image to their particular liking. Photo-editing software ranges from easy to use, one-click corrections, to powerful editors that can cost lots of $$$ and require a large learning curve for the amateur photographer. Therefore, your choice depends on what you want to do with the image. If you plan to publish images in a newsletter or post to a web site, a simple editor is all that you should need. However, if you plan on having your images published in a national magazine or book, then you may need to invest in a high end software package.
While I’m not going to go into a detailed review of all of the features that software packages offer or the different software packages that are available, I’m will concentrate our discussion on a few simple changes that can be done to improve the overall image. Remember, changing these features will not improve a photo that is under- or over-exposed, or one in which the subject is out of focus. A good photograph is still governed by the basic photography principals. However, you can do a little ‘cheating’ to enhance the photo and get a better image. For this discussion, I used the Adobe Photoshop Elements software package that was recommended to me by Denny Lloyd, and is one of the packages that he uses to produce custom decals.
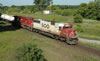
Original Photo
Click to enlarge
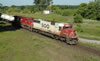
Altered Photo
Click to enlarge
Let’s start with a recent photograph that was taken along the CP Belleville sub in southern Ontario. As you can see from the first photo below, there are a few items that I wanted to remove or alter to improve the photo. For example, the first thing that caught my eye was the wire running through the middle of the shot. I also didn’t like the antennae cutoff in the background, the scrubby bush/tree in the foreground and overall sharpness of the image. While I haven’t shown it, before I reached this step the first thing I did was to crop the photo to capture the lead engine better, and remove the extra subject matter such as the track and the tree at the upper edge of the left corner of the photo. My next step was to try to sharpen the overall image, using the sharpen feature or the sharpen filters. These features allow the computer to evaluate the pixels, and focus blurry images by increasing the contrast on adjacent pixels to improve the clarity. I then used the cloning tool feature of the program to physically remove and fill-in some unwanted features, such as the electrical line running through the photo and the scrubby tree/bush. While on the surface this seems like a difficult task to actually remove something that was actually in the photo, it actually only took a few minutes. The clone tool allows the user to select a brush type and size, and essentially copy or clone portions of the picture that you like into another part of the image. While there are many brush types and sizes, I typically only use a few, as I want to capture a very small portion of the photo and paste it over a small item such as the electrical line. For the photo below, I selected several grassy areas along the hillside (both above and below the electrical line), copied them in small increments, and used the clone tool to paste in my new background. I continued to repeat the process the entire length of the wire until I was satisfied with the results. I followed the same procedure to remove the small tree, as I felt that it took the viewer’s eye away from the lead SOO engine. With these changes made, I kept the photo at the same size or resolution, and re-saved the image using a new file name. For convenience, I like to simply add a phrase such as “_rework” to the original photo file. I know have both the original photo and my enhanced copy.
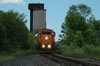
Original Photo
Click to enlarge
The other simple changes that I’d like to illustrate are the image brightness, color, sharpness, and contrast features. As you can see in the original photo, this was a fairly tight track side shot and I was experimenting with trying to get both the engine and the old sanding tower into a head on nose shot using a 300-mm zoom lens. Unfortunately, the Northlander was late this morning, and subject to Murphy’s law for rail fans, the clouds rolled in 5-minutes before the train arrived. If only it had arrived on time when there was sun. The end result was a darkened nose, poor illumination of the trees that line the tracks and a dark concrete structure. Using Photoshop Elements, I was able to enhance the photo and at least make it look a little better than the original.
In Elements, I have two options for going into editing mode. The simpler mode brings up a choice of general fixes that can be made to your image, such as image sharpening, contrast, color levels and an “auto smart fix”. The second option is to go into the full blown editing mode, which is what I typically choose.
Let’s start by cropping the photo to remove the extra trees along the tracks. Again a very simple process which allows the user to remove as much of the photo as they want. A simple drag of the icon over the area I want to keep and a few clicks and were done.
For conventional print or slide formats, the brightness is achieved by changing exposure times and contrast by the selection of photographic papers or filters when you’re in the darkroom. In digital photography, the software controls these aspects by allowing a user to drag slider bars or enter a numerical value to alter the image setting. To understand what effects these have, just change the brightness and contrast settings on your monitor. After cropping, I can either select the brightness feature or adjust lighting feature to try and take away the full effects of the hidden sun. With either of these features, I can by trial and error, adjust the brightness and contrast settings (brightness feature) or lighten and/or darken shadows or the midtone contrast (lighting feature). As I make adjustments to either setting, the computer constantly adjusts my image so I see exactly what my changes have done. For my photo, I used both features and simply adjusted the settings by a few percent (1-10%).
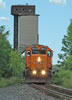
Altered Photo
Click to enlarge
The next setting I changed was the sharpness of the image. Sharpening is the process of emphasizing edges in a picture, creating the effect of more crispness or sharpness than the original image had. With Photoshop Elements, sharpness can be automatically set by the software or controlled by the trial and error method I previously described, adjusting the value until you’re satisfied with the results.
The final editing that I used was to copy portions of the single cloud that was present in the upper left corner, and paste that image into parts of the image so that my blue sky and just a little more interest to it. Copying involves using the lasso feature to define an area that you want to copy, followed by selection of the copy and paste commands. Once I had positioned my clouds in the areas I wanted, I again saved the image using a new file name.
Is there more editing I could for the image…yes, but at some point I have realize that there’s only so much I can do to enhance the image and I have to go on to the next photo. Programs such as Photoshop Elements literally have hundreds of adjustments that be made to alter an image. In the next article, I’ll tackle making backdrops by stitching together multiple images.